
How do bakeries make perfectly molded butter shapes? It's not that difficult. With the proper silicone butter molds, YOU can also make molded butter of different shapes. It will quickly add flair and elegance to any meal.
This guide will reveal how to use a butter mold at home. Starting with gathering the right tools and ingredients, we’ll give you a step-by-step guide for it. We'll also guide you in selecting the right silicone butter mold from PJbold that best suits your style. At last, we'll highlight common mistakes so your molding process doesn't go awry.
Let's get started!
Part 1. Equipment and Ingredients to Mold Butter
Before starting the butter molding process, you must collect the right tools and ingredients. Each component affects the final result. If you do it all ahead of time, you will have a more enjoyable and smooth experience.
Here are the details of must-haves as well as the optional extras.
Equipements:

| Item | Description |
|---|---|
| Silicone Molds | Various shapes and sizes for creating unique butter forms |
| Butter Wrappers | Parchment paper or wax paper for shaping butter |
| Small Bowls | For mixing and holding softened butter |
| Spatulas | For spreading, shaping, and transferring butter |
| Rolling Pin | For shaping and flattening butter |
| Cookie Cutters (Optional) | For creating decorative shapes |
| Piping Bags (Optional) | For precise shaping and intricate designs |
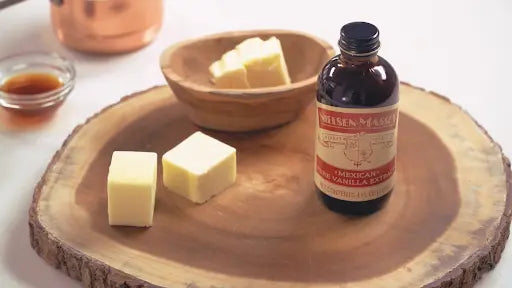
Ingredients

| Item | Description |
|---|---|
| High-Quality Butter | Unsalted or salted, depending on your preference. Can use cultured butter for extra flavor. |
| Softened Butter | Brought to room temperature for easier shaping. |
| Edible Decorations (Optional) | Herbs (e.g., chives, parsley), spices (e.g., paprika, chili flakes), edible glitter, dried flowers |
| Food Coloring (Optional) | Gel or liquid food coloring to add vibrant hues to the butter |
| Flavorings (Optional) | Extracts (e.g., vanilla, lemon, almond), infused oils (e.g., garlic, herb) |
Take some time to browse through the lists. Make sure you have all your essentials before you start shaping the butter.
Now, let's move on and see how to use a butter mold step-by-step.
Part 2. How to Use a Butter Mold to Shape Butter?
- Step 1 Soften: Soften butter to room temperature for easy molding.
- Step 2 Prep: Lightly grease or line your mold.
- Step 3 Fill: Pack softened butter firmly into the mold.
- Step 4 Smooth: Level the surface for a clean finish.
- Step 5 Chill: Refrigerate until the butter is firm.
- Step 6 Toppings: (Optional) Add herbs, spices, or other toppings before chilling.
If we answer it simply, you must soften the butter to room temperature. Afterward, you can put it in butter silicone molds and let it cool down before removing the final piece.
However, every process has some intricate steps. So let's go through it all step by step for perfect results:
Step 1: Soften the Butter
Let your butter sit at room temperature for 30–60 minutes. Do it until it's pliable but still holds its form.
Pro Tip: If the butter is too cold, it won't pack properly. If it's too soft, it turns greasy. So press your finger in the butter. You can proceed if there’s a slight resistance but no melting.
Step 2: Prepare the Mold
While your butter is reaching perfect consistency, prepare the mold. Apply a thin layer of softened butter or cooking spray for nonstick.
Pro Tip: You can also use butter wrappers for this process.

Step 3: Fill the Butter
Use a spatula or your fingers to press butter firmly into every nook and cranny of the silicone mold . A tight, even pack will guarantee sharp details and a flawless finish.
Pro Tip: Before filling the silicone butter mold, you can mix food colors or flavor extracts in the butter for a unique result.

Step 4: Smooth the Surface
Grab a knife or spatula and smooth out the butter silicone molds. You need a flat, clean base for professional-looking results.

Step 5: Chill Until Firm
Move the FDA-approved mold to the refrigerator for at least two hours. Well-chilled butter will hold its shape and unmold it cleanly. After that, just pull back the mold for an easy release.
Pro Tip: If using metal or polycarbonate molds, turn over and tap lightly against a surface. Don't force it, or you'll break the molded butter.

Step 6: Add extra toppings
Add extra toppings to your molded butter, like silver spray, chocolate chips, colored pills, etc… It will significantly increase the appeal of your molded butter.

By following these simple steps, you can turn plain butter into masterpieces. Try out this process with various shapes, patterns, and flavors!
Silicone Butter Mold's non-stick surface makes butter removal effortless, eliminating the need for greasing. Plus, silicone molds come in various shapes and designs, or you can use Custom Molds as per your design needs, allowing you to create beautifully molded butter with ease. Let’s explore how to use silicone molds effectively for shaping butter."
Now, let's move on to the next step.
Part 3. How to Store and Serve Molded Butter?

Without proper storage, your molded butter can lose its shape and freshness. It can even absorb the scent of last night's leftovers if things get worse.
So follow these tips to store your molded butter.
-
Short-term storage: Place your molded butter on a parchment-lined plate or in a shallow container. After that, loosely cover it with plastic wrap or transfer it to an airtight container. This barrier keeps unwanted fridge odors at bay.
Note: With this method, your butter maintains peak quality for up to two weeks.
-
Long-term storage: If you’ve made a large batch, you can freeze your molded butter. Wrap each butter shape individually in plastic wrap. After that, store them in a freezer-safe bag or container.
Note: Molded butter freezes well for months. You can simply thaw the molded butter overnight in the fridge when needed.
-
Serving tip: Take out molded butter from the fridge 15–20 minutes before serving. It will achieve that perfect, spreadable consistency. Improve the presentation by plating your butter with fresh herbs, edible flowers, or a sprinkle of flaky sea salt.
Note: Regularly Clean Silicone Molds get the perfect taste every time.
The next thing that will determine the perfect shape of your end product is the butter molds you use. Let's show you some excellent molds and how to choose between them.
Part 4. Choose the Right Mold for Butter From PJBold
Not all butter molds are created equal. Suppose you're looking for precision, durability, and effortless release. PJ Bold's FDA-approved silicone butter molds are ultimate.
-
The molds of PJBold are sturdy, BPA-free, and built to outlast conventional butter containers.
-
They're also temperature-resistant, making them suitable for both freezing and baking.
-
The molds are made of top-notch non-stick silicone that will make the process come out perfect each time.
-
With our custom molds, you can create a butter that stands out. You can make different shapes, designs, patterns, or even something bespoke.
You can instantly purchase rectangular silicone butter molds in purple, blue, and green colors. You also get lids for easy storage. They are great for making half-sheet slabs.
Explore the PJ Bold Silicone Molds and Butter Molds Collection today and begin making butter that is as stunning as it is scrumptious!
Before we end our article, let's briefly look at some common mistakes during butter molding.
Part 5. Common Mistakes to Avoid Molding Butter
Molding butter does not appear problematic. However, a few slips make even the most elegant designs frustrating. The key to success is precision. Avoid these common mistakes, and your butter will maintain its shape with excellent taste.
-
Using butter that is too cold
Issue: Butter that is rock-hard does not cooperate well
Solution: Let it soften to a pliable, spreadable consistency.
-
Over-softening the butter
Issue: Too soft butter turns greasy and loses the ability to hold its form.
Solution: If your butter starts feeling overly slick, give it a quick chill before proceeding.
-
Failure to pack the mold tightly
Issue: Air pockets are the worst enemy of a smooth, detailed design.
Solution: Pack the butter into every crevice with a spatula or your fingers to make it flawless.
-
Hurry the churning process.
Issue: Patience is not negotiable. Skipping or shortening this step leads to butter that crumbles or warps.
Solution: Let it firm up in the fridge for at least two hours before unmolding.
-
Using the wrong mold release
Issue: Silicone molds usually need no help, but other molds might.
Solution: A whisper-thin layer of softened butter or cooking spray prevents sticking. Just don’t overdo it, or you’ll compromise texture.
-
Unmolding too soon
Issue: Premature unmolding equals disaster. If the butter isn’t fully set, expect broken, misshapen pieces.
Solution: Always ensure it's firm before attempting to remove it.
-
Storing it wrong
Issue: Butter absorbs all the odors around it. When it is not stored correctly, flavor contamination takes place.
Solution: Keep it wrapped tight in plastic or seal it inside an airtight container.
Practice these details, and your molded butter will go from ordinary to extraordinary!
Conclusion
Molding butter is a simple technique. However, this technique can completely change the look and taste of your dishes. This guide has provided you with the groundwork for butter molding. We break down every step so that your creations appear flawless every time.
Experiment with different shapes and sizes. For consistent results, PJ Bold's premium silicone butter molds are excellent. Their food-grade construction, non-stick properties, and heat resistance make them an unbeatable choice for butter molding.
Frequently Asked Questions
Can I Use Flavored Butter in Molds?
Of course! You can make melted flavored butter of any variety, like garlic herb, honey cinnamon, or chili lime. Simply prepare the molds and pour the softened butter mixture in. Add a note for each to distinguish them from one another.
Can Butter be Reshaped if I Do Not Like a Design?
Yes! You can easily re-soften (don't melt) the butter and reshape it as desired. Just be aware that multiple softenings slightly change consistency.
How Long Does Molded Butter Last?
If refrigerated, it remains fresh for approximately two weeks. For extended storage, tightly wrap portions in plastic and freeze them for months.
What are Some Creative Ways to Decorate Molded Butter?
Before chilling, press in edible flowers, herbs, or spices. A dusting of paprika or edible glitter adds flair. For intricate designs, try piping melted chocolate or colored buttercream after unmolding.


